Render Widget
The Render Widget is a control panel to optimize your workflow. It's using Movie Render Pipeline for high quality rendering.
To open it the first time, right-click the asset named RenderWidget and choose Run Editor Utility Widget. It will now stay open between your sessions.

If your renders are crashing, you can try increasing the TDRDelay value
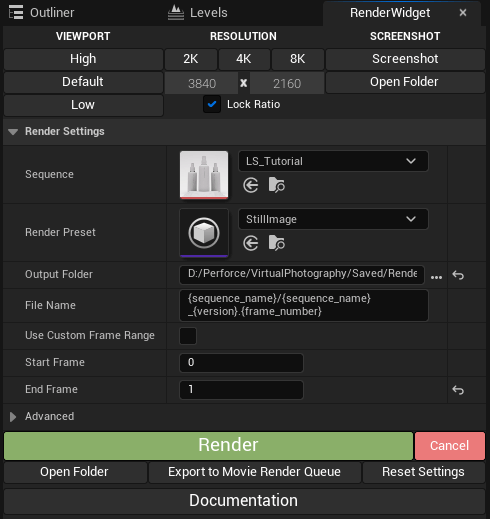
Viewport
Here you can change the rendering quality of the viewport. High gets you closer to the final render quality, and Low makes the viewport performance smoother if Default settings aren't performant enough.
Resolution
This is where you set your output image resolution. This controls both the Screenshot and Render outputs. This is working in sync with the Camera blueprint, where if you change the sensor size on the camera, it automatically updates the resolution for you, so you don't end up with black bars in your image. Uncheck Lock Ratio if you want to specify your own ratio and resolution.
Screenshot
With the screenshot button you can iterate on your scenes with quick snapshots. It uses the same resolution as the final render, and is connected to the Camera blueprint so you can be sure to always get the correct aspect ratio in your renders.
Use this to take quick snapshots where image quality is not important.
Render Settings
| Parameter | Description |
|---|---|
| Sequence | This is where you specify the sequence you want rendered. All renders needs a sequence to be able to render them. Use the preset sequences to save time. |
| Render Preset | This specifies the output format of your render. Choose from ImageSequence, StillImage or Video, or create your own. |
| Output folder | Choose where you want your renders to be. |
| File Name | Here you can further modify the folder structure and the name of your render output. |
| Use Custom Frame Range | If enabled, you can specify your own frame range. By default it is using the frame range from the Sequence you specified. |
| Render Method | Choose between Default and Path Tracer  |
| Image Format | Choose the format of your image output.
|
| Motion Blur Samples | Controls how many motion blur samples are rendered. Higher values give smoother motion blur. (This is called "Temporal Sample Count" in the Movie Render Queue.) |
| Spatial Samples | Controls the overall anti-aliasing quality. When using the Path Tracer, this controls the samples per pixel count. |
| Console Variables | This sets a bunch of console variables for high quality output. Add or remove as needed. |
Advanced Workflows
Export to Movie Render Queue
If you want to further tweak the render settings you can do so by exporting to the Movie Render Queue and continue from there.
Make sure to have the Editor Scripting Utilities and Movie Render Pipeline plug-ins enabled in your project, if you're not using the VirtualPhotographyKit project where they're enabled by default